

That’s right. I ran a Facebook ad campaign, got it in front of 8,700 people but couldn’t convert a single one.
Was it a failure?
Yes.
Did I learn from it?
You bet your ass I did.
In fact, I learned so much from this exercise that I’ve since become the “go-to” Facebook Ads guy in my network.
And now I want to share my knowledge with you.
I’ll break down my campaign step-by-step and show you why I thought my campaign didn’t work and how you can make sure yours does.
You’ll get your ad up and running and in front of your target audience within a couple of hours.
The Goal
My goal for the workshop was modest, I was only looking to fill the class with 30 students.
Why the small number? I wanted to give attendees the best value for their time and money. I was also going to help each and every one of them get their GA tracking code installed, set up at least one goal, one funnel and create multiple views to keep their data clean.
They would walk out of the workshop with the code live on their website and receiving data. It was going to be great workshop and I had all the details planned out.
I just needed 30 people to attend.
And with roughly 3.2 million people in the Phoenix area, this should be an easy feat to accomplish. I figure I would be done in about 24-48 hours…I may have been a little optimistic.
Setting up the AD
Like all good conversion-minded individuals, I created the landing page copy first and worried about images and graphics later.
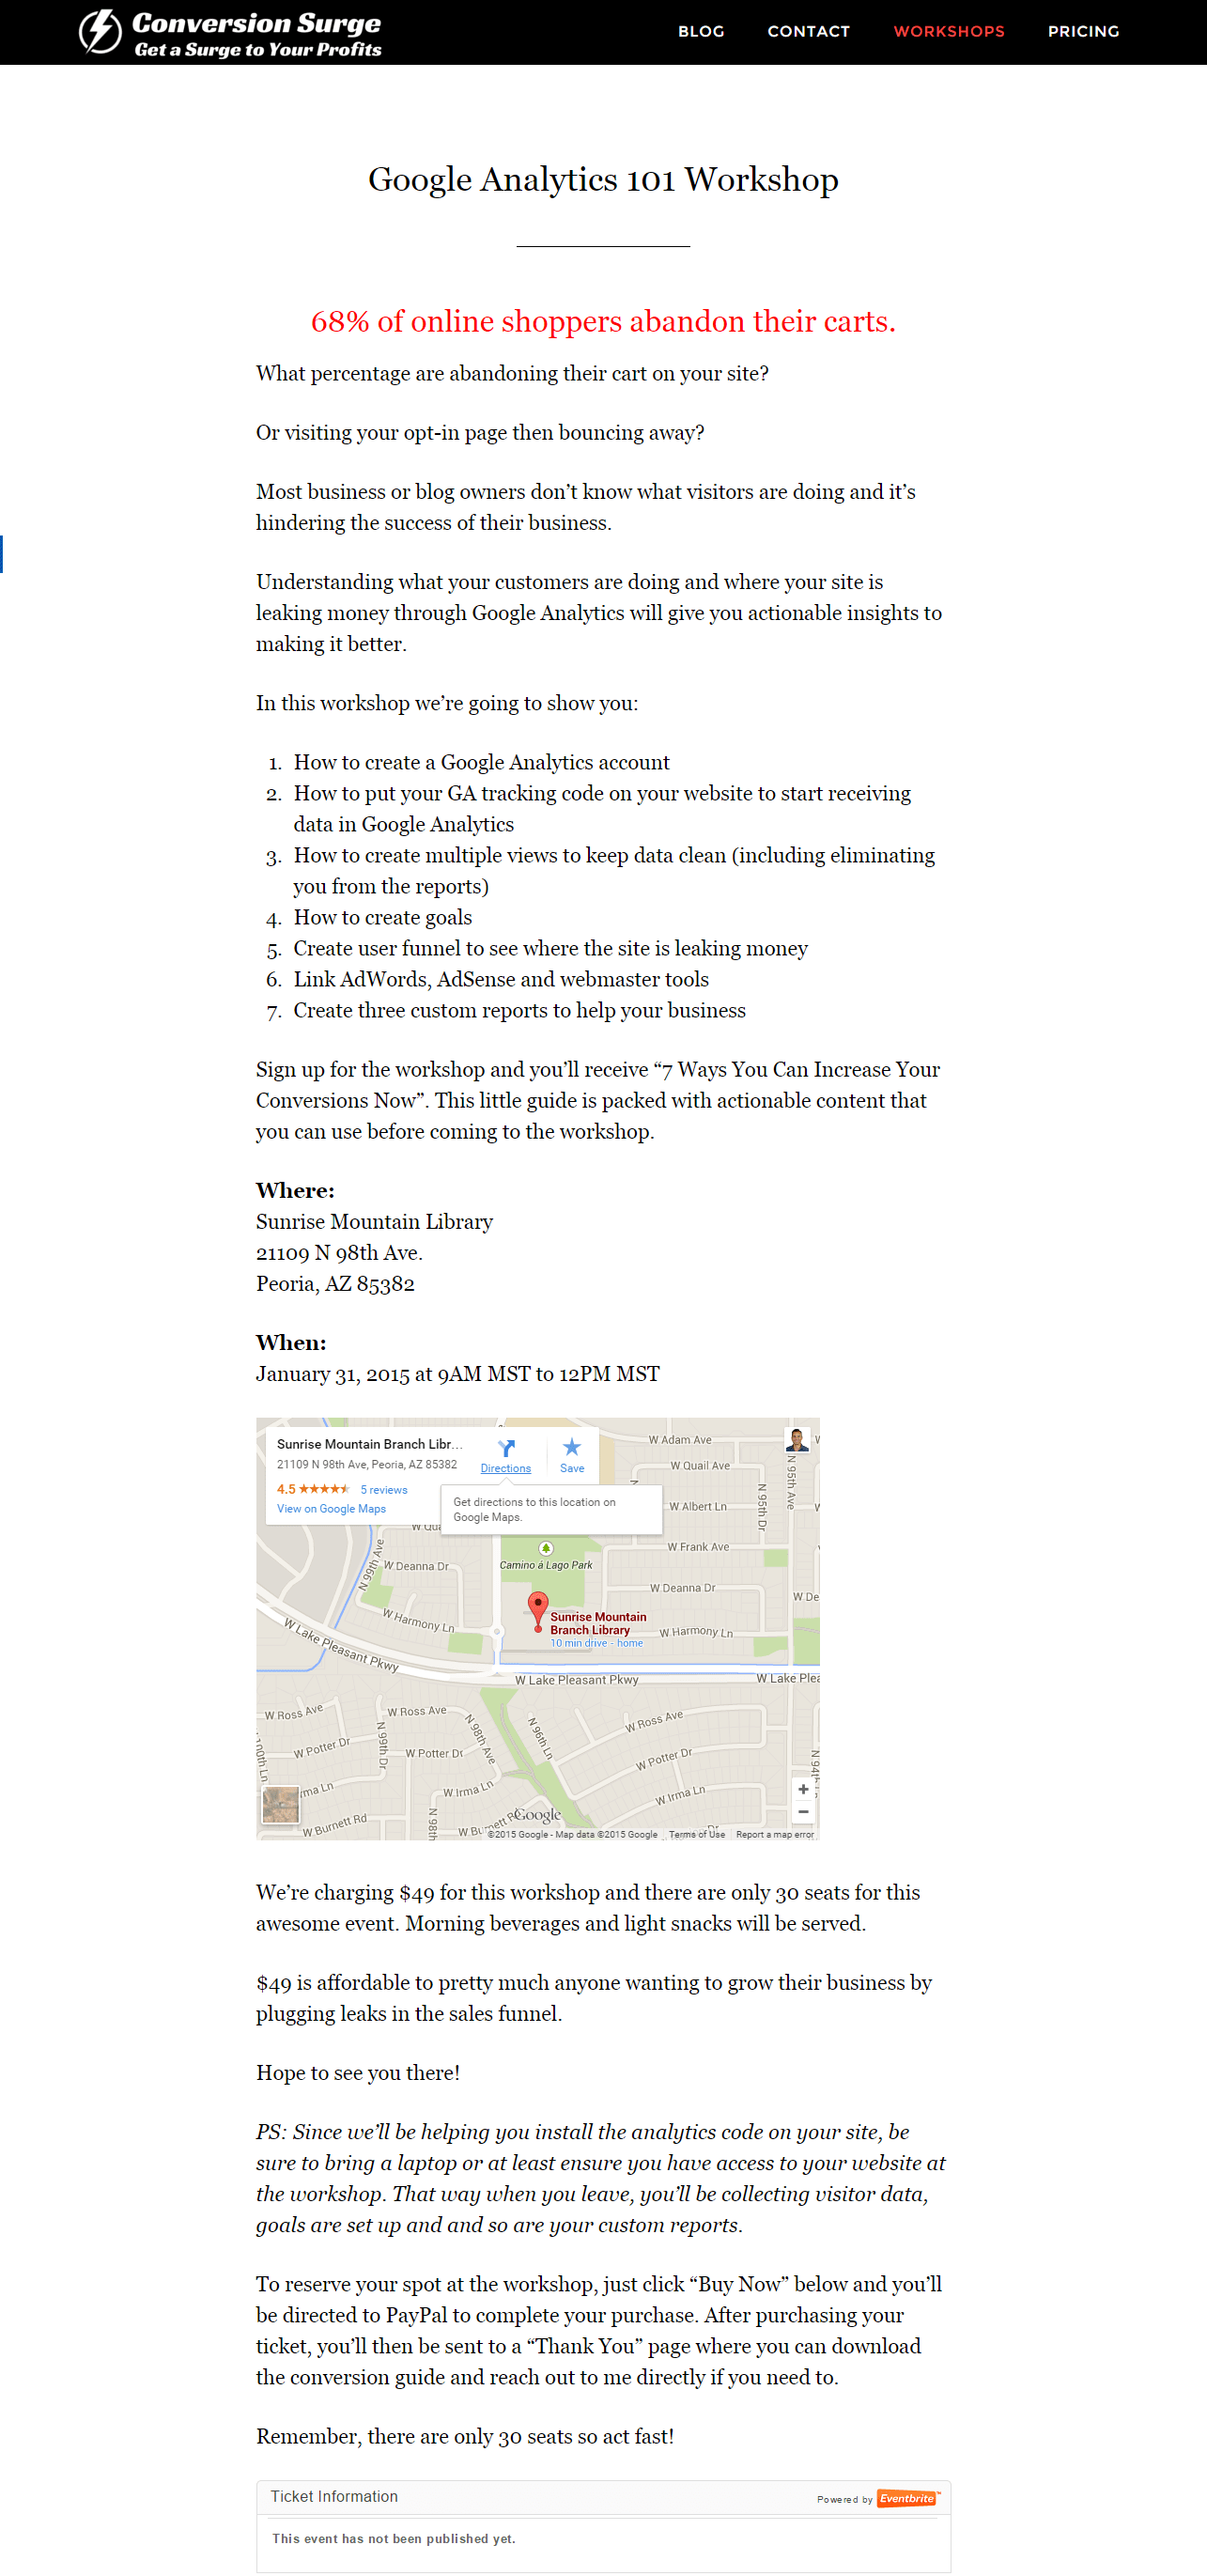
Click to Enlarge Image
With the landing page copy out of the way, I also needed to write my ad copy. This part was easy since all I had to do was ensure there was a message match between the ad and the landing page.
You’d be surprised to find out how many people waste a lot money on poor message match. My message was to convey 68% of all online shoppers abandon their carts and those who attended this workshop would be able to discover why this was happening on their site and reduce their abandonment rate.
With the copy written for both the landing page and the ad, it was time to get down to the fun part of running the ad: creating the ad image.
Developing the Creative
My go-to application for doing stylish image editing is Canva. It’s the easiest and cheapest (read: free) way to spruce up your images. It’s also great for building an email list. I don’t know where I’d be without it.
Maybe out a couple thousand dollars for paying graphic designers instead of doing it myself.
Anywho…
When using images on websites I’m working on, I avoid using cheesy stock photos. They just look, well, cheesy. Where do you find “not stock photos”? In a lot of places. In fact, here’s a list to get you started. Just be sure to attribute the image to the author where necessary.
After some tweaking, here’s what the first iteration of the creative looked like:  Thoughts on the Image
Remember the message match I mentioned? The image here communicates the intended message about online cart abandonment and how a prospective attendee to the workshop can “get to know” their website visitors to reduce their abandonment rate.
As for the background image, the intention there is to show someone shopping on your website, perhaps searching for a particular item to purchase.
With the ad copy ready and the ad creative ready, it was time to set up my first Facebook ad.
Creating the Ad on Facebook
There are a few ways to run an ad for your Facebook page. The common action people take is to click the “Boost Post” button at the bottom of a post. It looks like this:
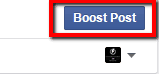
I’d only recommend boosting a post if it was:
- A newsworthy announcement for your fans like this guy or,
- You don’t want to get super specific about targeting your ad to an audience
Otherwise, I recommend going into Power Editor to create your ads. Here’s how you get there:
- Navigate to your Facebook page
- On the right-hand side, click the blue “Promote” button
- Click “Use Ads Manager”
- Then click “Power Editor” on the left side of the page

First time in Power Editor? Then it’s best to familiarize yourself with the layout of the dashboard.
If you’ve run any ads with Google Adwords, you’ll notice the tabs along the top are similar and arranged in the following hierarchy: Ads roll up to Ad Sets and Ad Sets roll up to Campaigns.
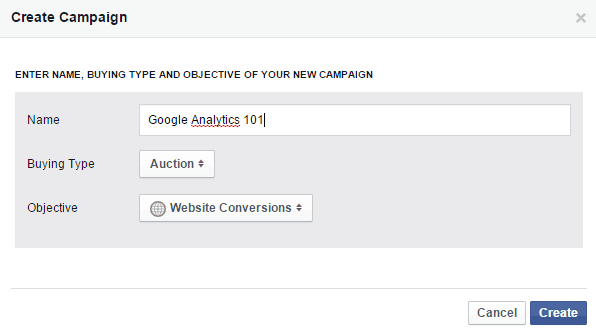
If you don’t have a campaign, create a new campaign by clicking the “+” button.

Name your campaign
It should go without saying but the name of your campaign should be representative of what it is you’re advertising. I named my Google Analytics 101, the name of my workshop.
Buying Type
I set the buying type of my ad to “Auction” since it is based my target audience and I planned on running the ad for a specific duration.
Objective
Set the objective of your ad to what it is you’re trying to accomplish. For me, I selected website conversions since I was promoting the visitor to my website to take a specific action: sign up for the workshop
Configuring the Ad Set
Click the “Ad Sets” tab and click the “+” to create the set of ads you plan to run for your campaign. In my case, I had only planned to run one set of ads for this particular workshop (remember, I only needed 30 people to sign up? This is gonna be SO easy!).
When creating your ad set, Facebook will ask you if you want to tie it to an existing campaign or create a new one. I tied this ad set to my existing campaign.
Budget and schedule
Choose the budget appropriate for your situation while keeping in mind this will eat into your profits. We can do some quick math on the workshop I was going to hold:
30 attendees at $49/ea = $1,470.
If I couldn’t get 30 people to sign up in 24-48 hours, I planned to run this ad for a week on a $10/day budget. That’s $70. I was completely okay with spending $70 to advertise this event.
Choosing your audience
This is by far the most critical part of running an ad on Facebook since you want to be sure your ad is being delivered to people who will find your ad relevant to their interests.
Take you time in choosing the location where your ad will be served, the age group, gender, language, interests and behaviors.
Leaving the audience blank will serve your ad to 180,000,000 people in the United States, which is cool, but will also waste your money since you’re not targeting a narrow audience.
I narrowed mine down to Glendale, Peoria and Phoenix (+/- 25 miles for each city).
Then I selected the appropriate interests for my target audience. I was targeting small businesses/entrepreneurs who had an interest in analytics, conversion optimization, google and web analytics.
I left behaviors blank.
You’ll notice as you narrow down your geographical area and interests, the potential audience reach is automatically adjusted to the criteria.
Yeah, so remember how I said it should be a piece of cake to get 30 people to sign up out of 3.2 million people in the area? Based on the criteria for my audience, my ad was only going to be served to 158,000 people.
Not bad but not quite 3 million.
I still liked my chances to get 30 people to sign up.
Ad Placement
Scrolling further down the Ad Sets setting, you’ll need to configure where you want your ad placed. By default, all boxes are checked and is how I left my ad settings.
Optimizing and Pricing
Set what you want your ad optimized for by reading the description of each category. Since I had chosen website conversions for my ad, Facebook recommended I go with that option. Just be sure you choose what is appropriate for your ad.

Configuring the Ad
With the Campaign and Ad Set configured, it’s time to create the actual ad for the Facebook News Feed.
Click the “+” button to create a new Ad.
You’ll be prompted to select what campaign and ad set this ad will be tied to. I linked my ad to the campaign and ad set I had just created.
Give your ad a name and be consistent with the naming. My ad name was Google Analytics 101.
Website URL
Make sure you’re web page is set up and you’re sending people to the right URL. Nothing worse than having them sent to the wrong page, check and then double check the URL.
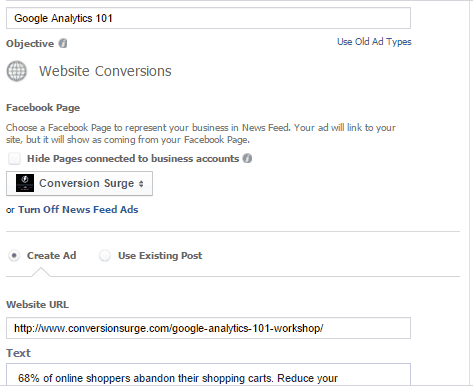
Ad Text
As previously mentioned, this part is critical for matching the message seen on the ad to the page destination.
MAKE. SURE. IT. MATCHES.
My ad text was as follows: “68% of online shoppers abandon their shopping carts. Reduce your abandonment rate by attending this workshop.”
Link Description (news feed only)
Use this space to provide a description of what it is you’re advertising and supports the ad text. My description read “Attend the Google Analytics 101 workshop to discover where your website is leaking money. You’ll set up goals and analyze your sales funnel to plug the leaks.”
Headline
The headline here isn’t what people will see first. Is it the biggest font on the ad? Yes. Should it be a call to action? Yes. I wanted people to sign up to the workshop so my headline read: “Sign up for the Google Analytics 101 Workshop”.
It’s not creative or clever but it is clear what it is I want people to do. Always keep this in mind as you write copy: clarity trumps persuasion every time.

Scrolling further down the ad settings you’ll be asked to enter a “display link” if your URL is long. I left mine blank but I suppose I could have entered conversionsurge.com as the display link.
Upload ad image
Self-explanatory, just upload the awesome image you created. However, do take note of the small text just below the image regarding Facebook’s policy stating no image shall contain more than 20% of text.
How does my image look? Pretty close to 20%, right? I used the manual calculator and I thought it was close so I decided to leave as is.

Call to Action
Another important choice here. Be sure to properly align the call to action with the action you want people to take. As you can see, I chose “Sign Up”. Here are your options:
- Book Now
- Download
- Learn More
- Shop Now
- Sign Up
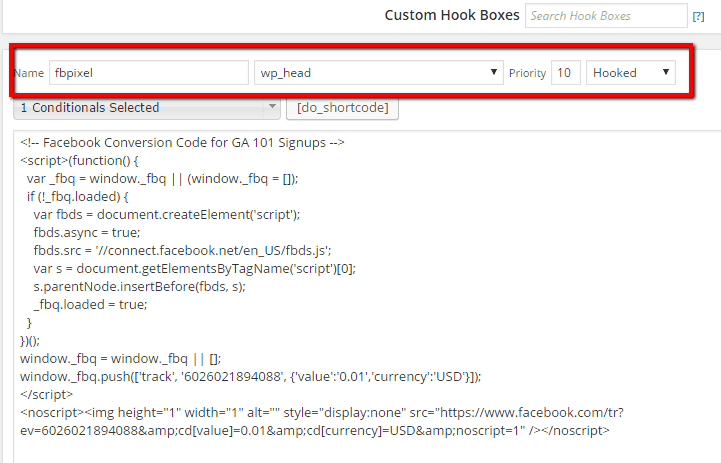
Conversion Tracking Pixels
If you plan to track the number of actions people take on the web page you are sending them to, you’ll need to install a conversion tracking pixel on the page.
And of course you want to know how well your Facebook ad is converting, right?! Creating a pixel is not difficult but installing the necessary javascript might be a little challenging depending on your technical skill level.
Here’s how I created and installed my conversion tracking pixel:
Click “create conversion tracking pixel” then choose the type of conversion you want to track. Mine were signups so I chose other conversion
![]()
![]()
Once you hit create, you’ll be asked who will install the Java Script. If you are comfortable doing it, place this code between the <head> </head> tags and then refresh the page. Head back to Power Editor to verify the pixel is installed.
There’s also an option for setting value every time the conversion happens. I took advantage of this and set the value to 49. This allows me to quickly see on the Ads Manager dashboard how well my ads are doing and if I’m going in the hole or getting a return on my investment.
Installing the Conversion Pixel on My Webpage
Conversion Surge is powered by Genesis and there’s a plugin I use to make changes to this site from Cobalt Apps called Genesis Extender. If you’re really into making custom changes to your Genesis site, then I highly recommend this plugin.
Since I only wanted this pixel to be shown on specific pages and not every page of my website, I created a custom hook box. You can think of it like a conditional command.
If you don’t have the ability to create custom hooks using Genesis Extender, it can also be done by writing conditionals in your functions.php file if you’re running WordPress.
Review the Ad
Power Editor automatically saves changes to your ad. As you’re updating the ad, be sure to carefully review every part of your creative to ensure everything is to your liking. Click on all the views to see what the ad will look like when being shown on:
- Desktop News Feed
- Mobile News Feed
- Right Column
- Audience Network Interstitial (optional)
- Audience Network Banner (optional)
If it all looks good, it is time for you to get the ad approved.

My ad previewed in Power Editor
Getting the Ad Approved
With my ad created and my conversion pixel in place, it’s ready to be uploaded for approval by the Facebook ad team.
To submit changes to any of your campaigns, ad sets and ads, you need to upload them to Facebook. Simply click this green button when you’re ready to submit for approval:
![]()
Now wait.
Getting Rejected
Hey, happens to the best of us right?
Shortly after uploading my changes to the Power Editor I was notified my ad had been rejected by the review team?
Why?
Remember the image rule stating no more than 20% of the image can contain text? Well, I guess mine had a little more than 20%. As a matter of fact, they came back and told me I had a whopping 52% of my image covered with text.  I disagreed but it didn’t matter — I needed to change my image.
So I did.
But to be honest, I wasn’t as fond of the second image. Check it out:

New FB ad image
Thoughts on the new image
Although not showing a user and a keyboard on this image, there is a user on his mobile device presumably browsing a site to make a purchase or a download.
And since we all know how important it is for websites to be mobile-friendly, I opted to communicate this with the image. Then there is the workshop name and subtitle along with the Conversion Surge logo.
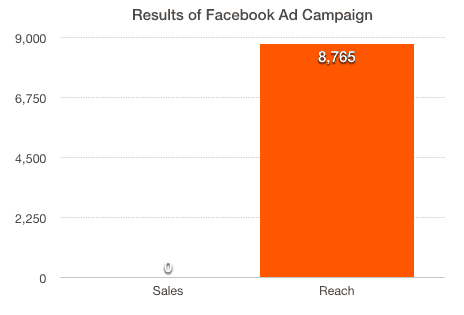
Results of my Facebook Ad Campaign
Not much drama here. You already know the results. Served to over 8,700 people with zero sales. We need to know WHY. Here’s an overall view of how the ad performed during the week.  Summary of the chart:
- Notice the reach, not quite the 158,000 people the Power Editor estimated
- The 86 conversions represent visitors who came to the landing page, not the thank you page
- Cost per conversion isn’t bad in my opinion
Mobile vs. Desktop
You know the whole discussion about how mobile is super important these days? Yeah, well it’s true. For this campaign, 60% of my traffic was via mobile which represented a reach of 5,781 people.
Mobile users also had the highest number of clicks (89) on my ads.
However, the cost to acquire those mobile users comprised of 68% of my campaign dollars ($30).
Bottom line: absolutely pay attention to users who rely on their mobile device in every bit of marketing you do.

Thoughts on Why My FB Campaign Failed
Just as it is when A/B tests don’t go the way you thought it would, I like to think of my Facebook advertising “fail” as validated learning.
Meaning although I did not get the results I had intended to achieve, I still learned a helluva lot from running this campaign.
For example…
The Landing Page
I actually struggled with this a bit. Not in the sense I didn’t know how to create one, but rather in the sense of whether I should have used a dedicated landing page without external links (or as I like to call them, escape routes).
What do I mean?
Have a look at the landing page again and tell me if you see something wrong. Did you see them? I had links to my Blog, Contact, Pricing, etc. And as users scrolled to the bottom there was a Call to Action button for them to get started on fixing their website.
Hindsight now, it’s obvious I should have used LeadPages to capture sign ups.
But guess what? I’m not sure it would have mattered.
How do I know?
Because I had heatmaps installed from SumoMe. Check it out: 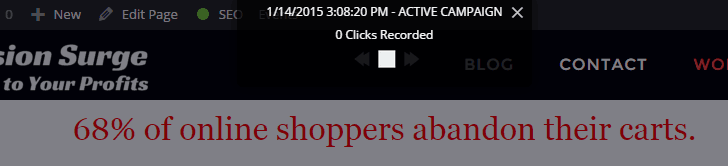 There weren’t any clicks recorded.
The thinking at the time was people may want to see what Conversion Surge was all about — especially since this was going to be my first workshop in the Phoenix area.
Nonetheless, I should have used a dedicated landing page without external links. Lesson learned. Always use a landing page for a marketing campaign.
Speaking of Landing Pages
LeadPages integrates tightly with Facebook and it’s been well documented by LeadPages that if you route users to the tab on your Facebook page, your cost per click will be lower than sending them outside of Facebook.
I may try this option in the future but in my opinion I think people will be too distracted while viewing the page in Facebook.
Image Graphics
Not gonna lie here, I spent a ton of time on getting those images just right and yet the first one still got rejected. Next time around I’ll try and do a better job of communicating with the image (without words) to drive more clicks on the ad.
Sales funnel
I used Eventbrite to manage the transactions. However, getting it to integrate with my website and Google Analytics wasn’t as good as I hoped it would be.
For example, when embedding the code to let people buy your tickets there was a scroll bar at the bottom of the iframe people had to move to see the entire table.
Also trying to discern which Eventbrite page was which in my Google Analytics account was a bit challenging due to the page naming convention. I had to do some testing of my own to ensure the goal and funnel were set up correctly in my GA account. 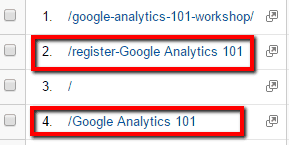 Where #1 is the landing page for the event on Conversion Surge, #2 is the register page on the Eventbrite site and #4 is when a person would view the page directly on Eventbrite through their channels of promotion.
Lack of Fame
It’s true, I’m no rockstar. And maybe this had something to do with people not signing up. A Facebook advertising report by Academia shows that targeting existing fans leads to a 435% increase in conversions.
Like I mentioned, this was set to be my first of many workshops like this to be held in the Phoenix area and my FB page has fewer than 100 likes.
Yet, I have set up Google Analytics accounts for numerous people. I should have used testimonials from these people on the LeadPages landing page I should have used.
Price
Was $49 too much for people to pay? I really wanted to know.
So I installed a survey tool on the landing page asking them “What is the one thing preventing you from signing up for this workshop”?
Yet, no one told me.
Which bums me out because I needed to know why people weren’t signing up. Part of conversion optimization research includes surveying site visitors to determine why they took a particular action or why they aren’t taking a particular action.
Either way, to find out someone has to fill out the survey. And sometimes people just don’t do what you want them to do.
Your Take
Will I ever run a Facebook ad again? Definitely.
I’ll continue to test different approaches to see what works best for me when advertising on Facebook.
What’s worked best for you when advertising on Facebook?
Take the lessons learned from my campaign and make sure yours won’t do the same.
Based on what you read here, why do you think I had ZERO sign ups to this workshop?
I’d love to know 🙂